With Easter around the corner, now is the perfect time to get creative and indulge in some Easter craft. This can be turned into a fun family activity, or simply something to let those creative juices flow! Here are some of our favourite Easter craft ideas and how you can create them.
Chocolate bird nests
These are very easy to make, and also taste great too. Using melted chocolate and crunchy noodles, you can mimic the look of a birds nest- and pop some Easter eggs on top to finish off the look! Here’s how to make these adorable treats.

You will need:
A block of your favourite chocolate
Fried noodles (like these)
Chocolate Easter eggs (we recommend the speckled ones to look more realistic!)
1. Melt the chocolate in the microwave or over a stove top as you normally would.
2. Add the melted chocolate and fried noodles into a bowl, and mix until combined and all of the noodles are covered in chocolate
3. Place spoonful’s of the chocolate mixture on a tray lined with baking paper
4. With the back of a spoon, create an indent in the mixture and place your Easter eggs inside like they’re sitting in a nest
5. Pop these in the fridge for at least 2 hours to set, and enjoy!
Credit: Bake Play Smile
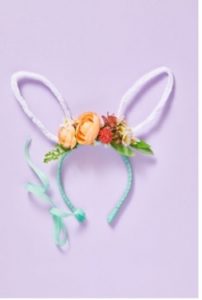
DIY Easter headbands
This is a great activity to do with young children. What’s more fun than dressing up as the Easter bunny! This craft is also very customisable, so you can create whatever your heart desires.
You will need:
Basic headbands. These can be purchased at most stores such as Kmart, Target, and Big W. (We recommend ones like these. You can also find smaller ones if you’re going to be making the craft with young children)
Pipe cleaners (Try and find ones on the longer side to make the craft easier. You can change up the colour and style of these to whatever you feel like)
Craft glue
Any extra additions such as glitter, ribbons, or fake flowers.
1. The first step is to pick out two pipe cleaners that you’re going to form the bunny ears with.
2. Looping the pipe cleaners into the shape of bunny ears, attach each end by wrapping it around the headband. You can make sure these are extra secure by applying some glue, but they should hold fine without it.
3. Decorate! You can add whatever decorations you like. Some ideas are adding flowers like in the above image, or adding glitter to make the design pop.
Credit: Good House Keeping
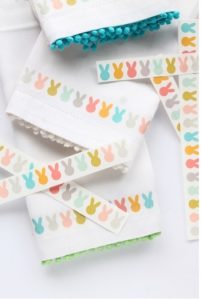
Hand-made Easter napkins
If you’re looking for something a little more creative and advanced, this one is for you. Creating your own Easter napkins or tea-towels using iron on paper is a fantastic way to express yourself-and you’ll also have the designs for years to come!
You will need:
Plain cloth napkins or tea towels. (You can pick different colours and patterns, just make sure you will be able to see your design once ironed on top)
Iron on paper (This can be bought at many stores or online, such as Kmart)
A printer or somewhere to go and print
An iron
1. The first step is to find your design. Have a look on the internet and find any Easter themed design that you like! We recommend not finding one that is too complicated, as these can sometimes not transfer too well. Try to find something on the more simple side, such as the image above.
2. Print this design out on the iron on paper as per the papers instructions. If you don’t have a printer or computer at home, you can visit a printing shop or ask a family member to help you
3. Once your design is printed and ready to go, the next step is to cut it out and get your fabric ready!
4. Lay your cloth napkin or tea towel down on a flat surface that is okay to iron on. We recommend giving it a quick iron to make sure it is wrinkle-free and that your design will go on properly
5. Iron on your design wherever you would like it as per the instructions on the paper, and you’re done! You have wonderful personalised napkins or tea towels to use for many Easters to come
Credit: Squirrellyminds